3d Halloween Background Design: Elevating Your Digital Presence
In the crowded digital landscape of October, standing out requires more than just a festive color palette. It demands depth, texture, and a sense of immersion that flat images simply cannot provide. This is where 3d Halloween Background Design transforms from a novelty into a strategic asset. Whether you are launching a product, running a seasonal ad campaign, or updating your portfolio, the right background sets the tone before a single word is read. However, many creators stumble when attempting to integrate these complex visuals, often resulting in files that look cheap, load slowly, or fail to communicate the intended message.
The allure of three-dimensional graphics lies in their ability to create a tangible space. Unlike a static photograph, a 3D environment allows for dynamic lighting, realistic shadows, and perspective shifts that draw the viewer's eye deeper into the composition. For marketers and small business owners, this translates to higher engagement rates and longer time-on-page. Yet, achieving this professional look without a degree in computer graphics requires understanding the nuances of file formats, resolution, and integration techniques.
The Hidden Pitfalls of Downloading Ready-Made Assets
One of the most common errors beginners make is assuming that all downloadable assets are created equal. When searching for a 3D scene, it is easy to click on the first image that catches the eye, only to discover later that the file is incompatible with your workflow or lacks the necessary flexibility. A high-resolution preview does not guarantee a usable source file. Many users overlook the specific format requirements, such as needing a Vector eps 10 file for scalable editing, or settling for raster images that pixelate when resized for different banner sizes.
If you purchase a design that is locked in a proprietary format or lacks editable layers, you may find yourself unable to customize the text, swap out props, or adjust the lighting to match your brand guidelines. This rigidity can kill a campaign before it starts. For instance, a freelancer working on a client's website might need to place a wooden podium display in a specific corner of the screen. If the background is a flattened image rather than a layered project file, moving that element becomes impossible without ruining the quality of the surrounding pixels.
Furthermore, relying on low-quality textures can undermine the entire presentation. In 3D rendering, the illusion of reality depends heavily on surface detail. A "spooky" forest background that looks good at thumbnail size might reveal muddy, repetitive patterns when viewed up close on a desktop monitor. This lack of fidelity signals amateurism to your audience. To avoid this, always inspect the texture maps and polygon counts if possible, or request sample renders at full resolution before committing to a purchase.
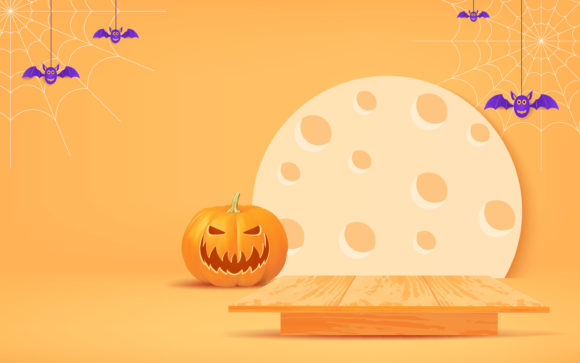
Mastering the Wooden Podium Display Integration
A trending element in seasonal promotions is the Halloween background design with wooden podium display. This setup creates a focal point for showcasing products, awards, or key promotional offers. The contrast between the rustic, warm tones of wood and the eerie, cool atmosphere of a Halloween scene can be visually striking. However, integrating this element correctly is an art form in itself.
A frequent mistake is ignoring the lighting consistency. If your 3D background features moonlight casting blue shadows, but your wooden podium is lit by a harsh, warm spotlight, the result will look like two separate photos pasted together. This disconnect breaks the viewer's suspension of disbelief. To ensure realism, the light sources must align. Check the direction and intensity of shadows cast by the podium against the floor and walls of the background. If the shadows do not match, the object appears to float, destroying the illusion of depth.
Another critical consideration is scale. A podium that looks appropriate in a thumbnail might appear comically large or impossibly small in a full-screen banner. When designing for various devices, from mobile phones to desktop monitors, the proportions of the podium relative to the background elements must remain consistent. A good approach is to use reference objects, such as pumpkins or tombstones, to establish a sense of scale early in the design process. This ensures that your promotional content sits naturally within the environment.
For those using vector-based workflows, the advantage of a Vector eps 10 file becomes apparent here. Vector graphics allow you to resize the wooden podium and its decorative elements without any loss of quality. You can adjust the grain of the wood, change the color of the velvet cloth draped over it, or modify the typography on the signage instantly. Raster images, by contrast, would require you to start over if you needed to make significant changes to the dimensions.
Selecting the Right Format for Promotion
When evaluating options for your Halloween campaigns, the file format is a decisive factor. While modern software supports a wide range of extensions, sticking to industry standards like Vector eps 10 file ensures maximum compatibility across different design platforms. Older versions of Adobe Illustrator or other vector editors might struggle with newer file types, leading to missing fonts or broken links. EPS 10 is widely recognized as the sweet spot for compatibility and feature support, offering a balance between advanced capabilities and broad usability.
Consider the end goal of your design. Are you creating print materials like flyers or posters? Or are you focusing on web banners and social media ads? For print, high-resolution raster files (300 DPI) are essential, but for web use, optimized vectors or lightweight 3D renders are superior. Using a heavy 3D render for a mobile banner can slow down page load times, causing potential customers to bounce before seeing your offer. Always optimize your assets for their intended medium.
Additionally, check the licensing terms associated with the background design. Some free downloads come with restrictions that prohibit commercial use, which could lead to legal issues if you plan to sell products or services during the holiday season. Professional assets usually come with clear licenses that allow for modification and commercial application, giving you peace of mind. Never assume a "free" download is safe for business use without reading the fine print.
Practical Steps for a Flawless Execution
To ensure your 3D Halloween projects succeed, adopt a checklist approach before finalizing your designs. First, verify the technical specifications: Is the file editable? Does it meet the resolution requirements for your target platform? Second, assess the visual harmony: Do the colors, lighting, and textures work together to tell a cohesive story? Third, test the usability: Can you easily insert your own text or product images without disrupting the composition?
When setting up your workspace, pay attention to the negative space. A cluttered background can distract from your main message. Leave room for your call-to-action buttons or promotional text. In a Halloween background design with wooden podium display, the podium should serve as a stage, not a barrier. Position it so that it guides the viewer's eye toward the information you want them to see, rather than blocking it.
Finally, don't be afraid to iterate. The first version of a 3D scene rarely needs no adjustments. Tweak the lighting, experiment with different camera angles, and refine the textures until the mood feels just right. By taking the time to correct common mistakes and choosing the right tools, such as reliable Vector eps 10 file assets, you can create Halloween promotions that are not only festive but also professional and effective. This careful attention to detail separates successful campaigns from those that get lost in the noise of the holiday season.